Installing @ngrx/store
Create a new Angular application and install @ngrx/store.
In the following coding exercise we will do the following:
- Create a new Angular application
- Install
@ngrx/store - Install
@ngrx/store-devtools - Install Redux DevTools Chrome extension
- Populate the state with some data
- Inspect the state using Redux DevTools
We will cover here the starting point of combining Angular and NGRX, including some recommended tools and best practices you should use.
Create a new Angular application
You can start a new Angular application using the Angular CLI.
npx @angular/cli@latest new ngrx-store-install --minimal --style css --routing falseThis will create a new angular application, the --minimal flag will create a minimal application with minimum files (--inline-template, --skip-tests, --inline-style).
We also chose to create the application with css style and without routing.
OnPush
with NGRX you will get the data as Observable which makes angular applications with NGRX ideal for OnPush change detection strategy (in all the components).
change the app.component.ts changeDetection to OnPush
import { ChangeDetectionStrategy, Component } from '@angular/core';

@Component({
	...
	changeDetection: ChangeDetectionStrategy.OnPush
})
export class AppComponent {}Best Practice Tip
It's recommended to use OnPush on all components in your application, not just the root component.
Follow this best practice tip to make angular cli generate OnPush components, as well as adding a lint rule to verify OnPush is set for all components
Install @ngrx/store
Each of the @ngrx/* libraries has an ng add command that will install the library and add additional boilerplate code.
In your angular application run the following:
npx ng add @ngrx/store@latest --skip-confirmationRunning this command will npm install @ngrx/store and also add the following change to src/app/app.module.ts:

Notice that NGRX StoreModule.forRoot({}, {}) is added to the imports array with empty objects, which mean we will have an empty state in NGRX.
Install @ngrx/store-devtools
It's recommended that on Angular+NGRX applications, you will work with @ngrx/store-devtools which will allow you to inspect the state of your application.
npx ng add @ngrx/store-devtools@latest --skip-confirmationRunning this command will npm install @ngrx/store-devtools and also add the following change to src/app/app.module.ts:
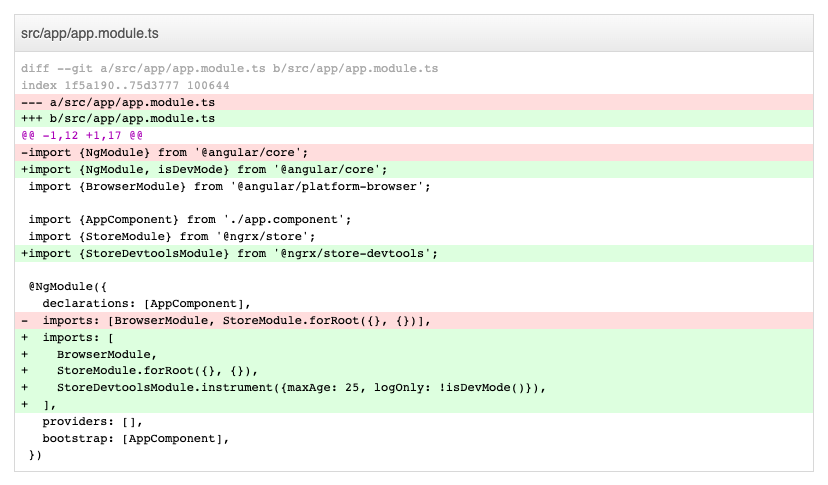
Notice that StoreDevtoolsModule.instrument() is added to the imports array.
Best Practice Tip
In production, it's best not to add the StoreDevtoolsModule to the imports array, in fact it's best to completly remove the @ngrx/store-devtools from the bundle.
Check out our best practice tip here
Install Redux DevTools Chrome extension
In order to inspect the state of your application, you will need to install the Redux DevTools Chrome extension.
Click this link and add the extension to your browser.

Inspect your state with Redux dev tools
Let's populate our state with some initial data, and make sure we can examine that data with Redux dev tools.
import {NgModule, isDevMode} from '@angular/core';
import {BrowserModule} from '@angular/platform-browser';

import {AppComponent} from './app.component';
import {StoreModule} from '@ngrx/store';
import {StoreDevtoolsModule} from '@ngrx/store-devtools';

@NgModule({
  declarations: [AppComponent],
  imports: [
    BrowserModule,
    StoreModule.forRoot(
      {
        counter: () => 0,
      },
      {}
    ),
    StoreDevtoolsModule.instrument({maxAge: 25, logOnly: !isDevMode()}),
  ],
  providers: [],
  bootstrap: [AppComponent],
})
export class AppModule {}We populated the state with counter: 0 (it's not important the exact syntax, we will learn about reducers later on).
Examine the state
Run our app:
npx ng serveopen the developer tools, you should see a new tab in the developer tools called Redux, this tab was added after installing the extension of Redux Dev Tools and you can use it to inspect the state.

This basic app will be the baseline of all the exercises you will do in the NGRX chapter.
This app has @ngrx/store as well as @ngrx/store-devtools installed.
We also installed the Redux DevTools Chrome extension, and used it to inspect the state of our application.